Official Luthiers Forum!
http://www-.luthiersforum.com/forum/

Armrest Bevel Veterans?
http://www-.luthiersforum.com/forum/viewtopic.php?f=10102&t=4424
Page 1 of 1

Author:  Matt Mustapick [ Sun Jan 08, 2006 5:09 pm ]
Post subject: 

Has anyone here built a guitar with the Laskin style (or any style) armrest bevel? How does one create the channels/ledges/whatever to receive the mitred purfling?Matt Mustapick38726.0484259259

Author:  j.Brown [ Sun Jan 08, 2006 5:36 pm ]
Post subject: 

Sounds like a question for Tracy Leveque, who has done quite a bit of research and information gathering on this particular subject.

-j.

Author:  Josh H [ Sun Jan 08, 2006 11:33 pm ]
Post subject: 

Tony Karol does some nice armrests. They are his own design and are simpler to do than the Laskin style. Check out his site for pictures. I am currently in the middle of building a guitar that features an armrest and ribrest in the Karol style. I am documenting the whole process with photos. Hopefully in the next 2 weeks or so I can post some of that stuff. There are a few other guys around here that have tried this. Although I haven't seen to many completed guitars with armerest other than Tony's. Tracy has some articles from Tony on doing the Laskin style, but Tony no longer does them that way. Maybe he will chime in. If you search through the archives you should be able to find some other threads on the subject.

Josh

Author:  tl507362 [ Mon Jan 09, 2006 6:37 am ]
Post subject: 

Here is the link to the articles found on a hidden page on my website:
Armrest Information
Hope that helps!
Tracy

Author:  TonyKarol [ Tue Jan 10, 2006 9:01 am ]
Post subject: 

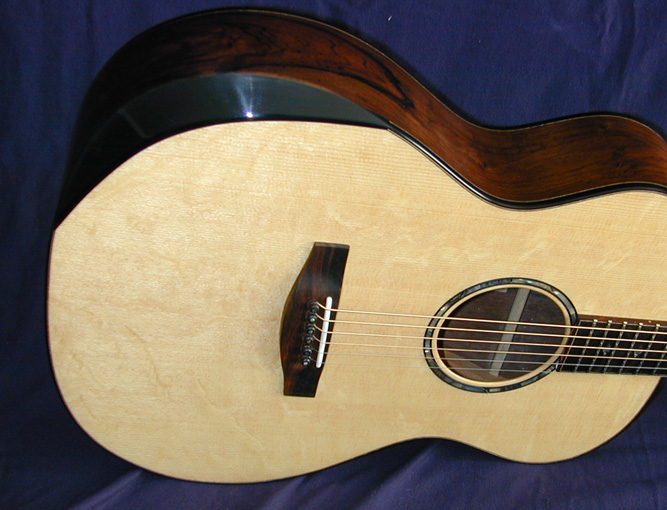
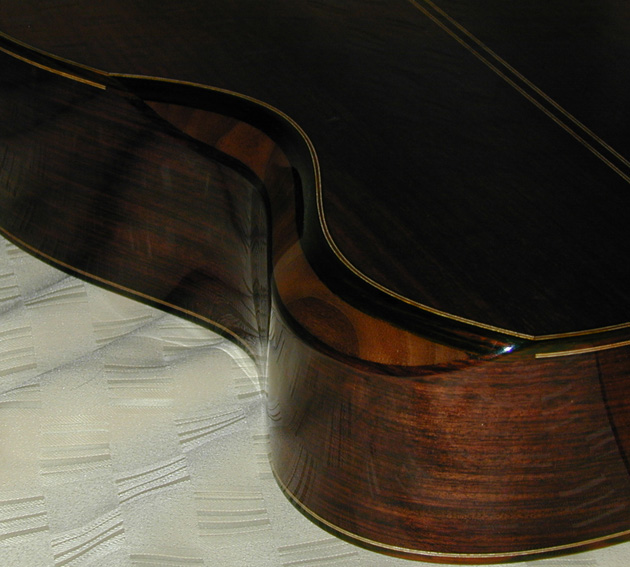
Here is one I did a couple years back - the customer wanted it to be all black, just morph out of the binding with no continuation of the purfling lines on the top edge. I dont purf the side edge at all anymore - the only real way to cut the troughs is by hand and it can be a real bear. So now I do them this way, or not at all !!!
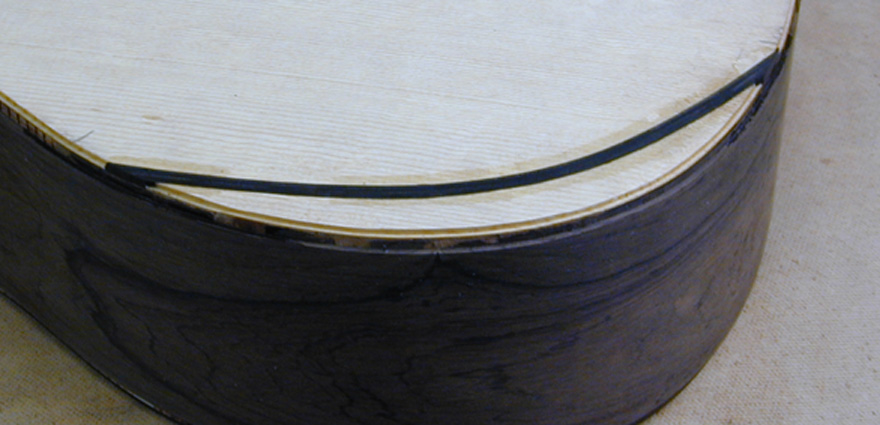
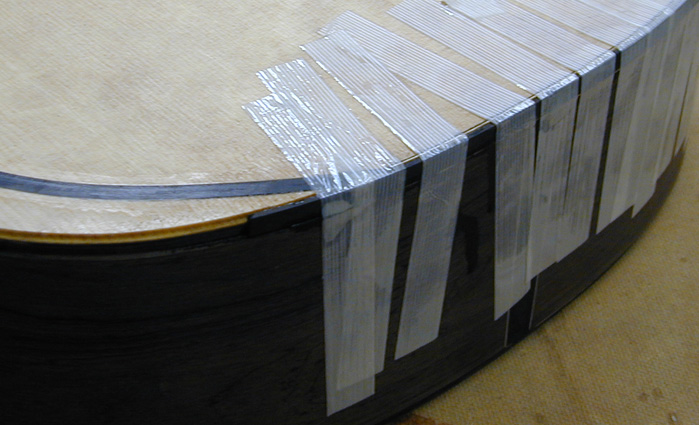
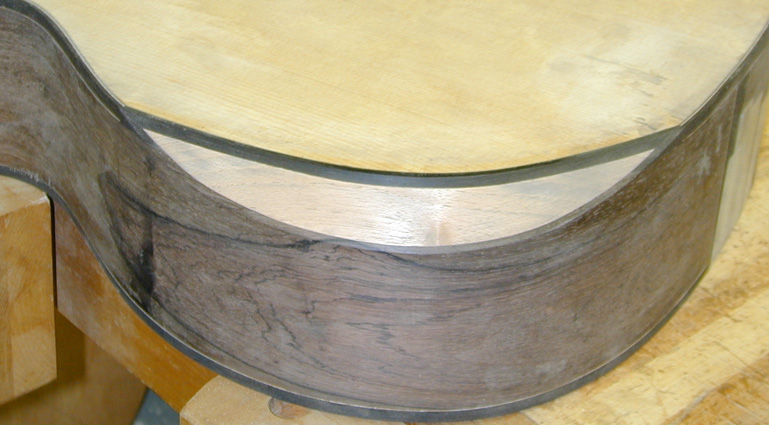
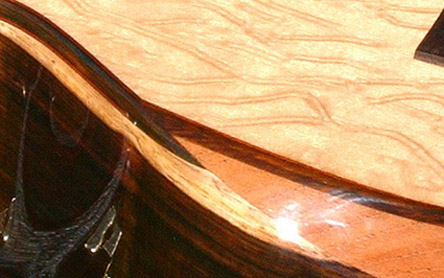
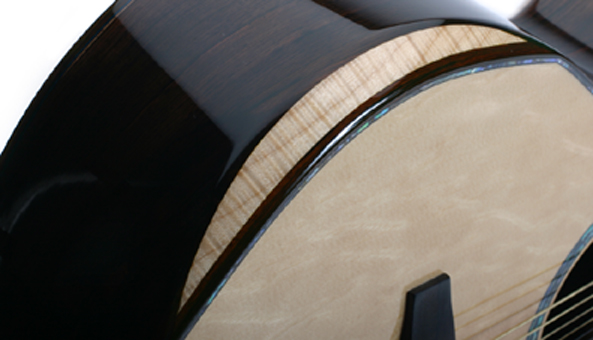
you will note in the one photo aways down how the ebony doesnt end nicely at the corner of the armrest smile as I call it. this is because the top binding is only about 1/32 deeper than the top thickness. This doesnt happen at all if the binding and back and sides are the same wood - thats actually how I prefer to do them if I can, otherwise I usually end up darkening the armrest, or lately I actually came up woth antoher way, which is to bind the top of the armrest at full binding plus purfling depth, then it just carves right into itself all at the same level. So anyway here are some photos - the first one shows that I cut all the binding and purf channels first, all the way around. The internal block is sized to be a bit bigger than the plexi template I use to route for the ebony binding shown inlayed here.

Author:  TonyKarol [ Tue Jan 10, 2006 9:03 am ]
Post subject: 

There were three pieces of ebony used to fill the channel in the previous shot - here I show how the binding overlaps the end of hte armrest - the side purf was stopped, and I filled the end void with a sliver of ebony

Author:  TonyKarol [ Tue Jan 10, 2006 9:05 am ]
Post subject: 

The side purf was actually stopped at the point of the armrest, where if there was a top purf line, the mitre would have been. I have also recently modded the template used to route such that the transition is smoother, not requiring a mitre on the top purf anymore.

Author:  TonyKarol [ Tue Jan 10, 2006 9:08 am ]
Post subject: 

So, once all the binding is glued on, you can carve in the armrest, making sure not to carve deeper than the internal block you made - keep notes before you glue it in, make a tracing of its shape, I always do. Then, once this one was finished and blacked out, it looked like this.

Author:  TonyKarol [ Tue Jan 10, 2006 9:10 am ]
Post subject: 

Oops had one more photo than I thought - the above shot shows how the binding looks when the binding and the side wood are different - if this guitar was bound is a brown brazilian, the armrest would have been nicely framed in, and the rest could have been left natural. Here is the finished shot.

Author:  TonyKarol [ Tue Jan 10, 2006 9:12 am ]
Post subject: 

If you want to see one done in mathcing side and binding, with a spanish cedar armrest blcok, ther is this look in natural ...

Author:  TonyKarol [ Tue Jan 10, 2006 9:20 am ]
Post subject: 

Here is a ribrest, natural, rest is black walnut, where the binding is dark brown braz on ei rw sides. The binding for the ribrest was done full height -ie, I cut the channel on the rest as deep as the side binding ledge was, so the binding depth looks continuous around the rest.

Author:  TonyKarol [ Tue Jan 10, 2006 9:22 am ]
Post subject: 

Here is an armrest, done in curly maple, where the sides and binding are braz - this one was done exactly like the top set of photos using the ebony, so you can see how the corner of the smile trims out nicely when the wood is all the same - frames the rest block in really sweet.

Author:  Dave Rector [ Tue Jan 10, 2006 10:02 pm ]
Post subject: 

Geeze Tony, those are all sweet! Uou sure raise the bar for the rest of us. Thanks for the pics!

Author:  Serge Poirier [ Tue Jan 10, 2006 11:07 pm ]
Post subject: 


Man! i ain't there yet!

SergeSerge Poirier38728.2974884259

Author:  Tom Dowey [ Wed Jan 11, 2006 12:31 am ]
Post subject: 

Wow, very cool. Thanks so much Tony. I am definitely trying that this weekend.

Author:  TonyKarol [ Wed Jan 11, 2006 1:24 am ]
Post subject: 

Hey Tom .. if you can get it done on a weekend, I may have some work for you to do !!!! But seriously, there are a few hours into these for sure, but the players love it, me included.

Author:  Tom Dowey [ Wed Jan 11, 2006 1:27 am ]
Post subject: 

I didn't say completed this weekend.
Practice on scrap this weekend and next weekend and next weekend....

Author:  Josh H [ Wed Jan 11, 2006 2:37 am ]
Post subject: 

I just glued in the block on for the ribrest. That was a tricky block to fit. It took me a few hours of sanding (I know I should have figured it out sooner ) before I was able to get it to fit properly. The next one will go a lot faster.

I'm getting excited. I should have the rim finished up today (it still needs two side sound ports and the kerf) and hopefully have it closed up by the weekend.

Josh

Author:  Matt Mustapick [ Wed Jan 11, 2006 5:42 pm ]
Post subject: 

Beautiful pictures. Thanks very much Tony!

Author:  TonyKarol [ Thu Jan 12, 2006 12:53 am ]
Post subject: 

Mucho Gracias .. amigos.

Author:  LanceK [ Thu Jan 12, 2006 7:11 am ]
Post subject: 

AAAAANG! Tony! Nice!

Author:  John Kinnaird [ Thu Jan 12, 2006 12:26 pm ]
Post subject: 

Thanks Tony. That was instructive.

Page 1 of 1 All times are UTC - 5 hours
Powered by phpBB® Forum Software © phpBB Group
http://www.phpbb.com/